
Thursday, December 4, 2008
Here it is at home
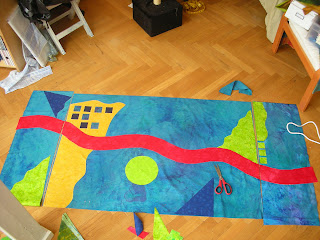
Here is Let's Hyggelize at home. A nice bright accent for Dark Danish December Days.

Sunday, November 23, 2008
Project Blehm becomes "Let's Hyggelize!"
Project Blehm was delivered 21 November, just in time to be hung for CPH Thanksgiving! Heidi held a naming contest and the finished piece is called "Let's Hyggeilze!"
Nanda came up with the winning name - very appropriate considering the very Hyggelig** time we had celebrating an early Thanksgiving with our CPH friends.
**Hyggelig is a Danish term that loosely translated means cozy, comfortable, friendly.

Nanda came up with the winning name - very appropriate considering the very Hyggelig** time we had celebrating an early Thanksgiving with our CPH friends.
**Hyggelig is a Danish term that loosely translated means cozy, comfortable, friendly.

Friday, November 21, 2008
The Tale of Two Backings
Tuesday: The plan for hanging this quilt was to add a second backing into which I could slip a piece of foamcore, then add a hanging wire. Well. For many reasons that did not work out. Tuesday eveing I put the quilt down. I knew what I had to do, but was not prepared to do it until Thursday.

Adding the velcro strip that was to be used to secure the backing after the foamcore was inserted:

At this point, I was rolling the quilt into a tube and hefting it over my shoulder to stitch the back and binding on:

Adding the velcro strip that was to be used to secure the backing after the foamcore was inserted:

Wednesday: Uncovered the quilt, looked at it, covered it back up. Considered my options.
Thursday: I knew I had to remove the existing back and binding and opt for a traditional hanging sleeve instead. I worked on this for about 3 hours, then took break to meet Heidi, Nanda, and Karine at a La Glace for the world's best hot chocolate. (Mmm) Back in the studio late afternoon to continue the work.
Friday: Finishing touches - added the last binding strip and finished hand-stitching the hanging sleeve. I made a sandwich of two pieces of foamcore with the quilt in between and wrapped it all in two layers of plastic and taped it securely. It has begun to snow - the first snow of the year - and I was delivering PB by train to Any and Heidi's. Probably a 5 minute train ride and 15 minute walk and man were my arms tired by the time I arrived!
Project Blehm. Completed November 21, 2008. Tomorrow I will take pictures of the artwork in it's new home!
Sunday, November 16, 2008
Sharon in the studio
Here I am hard at work in the studio! I should wrap up PB on Monday, Nov 17th. Now just need a dry day to deliver it!! Guess that's what those giant garbage bags were made for...


Tuesday, November 11, 2008
The Finishing Toches!

Whew! This part always takes longer that I imagine. And I am just a little anal about it. Here's the process of the last two days, which has taken about 7 hours thus far:
Square the quilt: This involves trimming off excess binding and making sure all the sides are straight. In this case, I also have to make sure the two small pieces are the same length and width and they are the same length as the large center piece.
Attach the backing: Cut white muslin and fusible web for each of the three pieces. Iron the muslin to remove wrinkles. Iron the fusible to the quilt, then layer the muslin on top of the fusible and iron to attach.
Make binding strips: Iron fusible to the binding material, then cut one inch strips. This will be added to the quilt by stitching 1/4" from the edge, then folding over and ironing to the back.
Attach top binding: Attach binding strip to the top of each piece only.
Add the second backing: This quilt has an additional backing sewn on three sides and left open on the top. The top of the second backing is not stitched, as I will slide a piece of foam ore into this opening and then close with Velcro closures. The foamcore will help the quilt hang nice and straight.
Add binding to the other three sides.
Insert foamcore and add hanging wire for each of the three pieces.
Thursday, November 6, 2008
Project Blehm is ready to bind!
Well, here it is stitched and squared and ready to be backed and bound. And a few more details just beacuse I like details. :-)


Tuesday, November 4, 2008


.JPG)
.JPG)
.JPG)
Thursday, October 9, 2008
Taking shape, adding more detail

My goal is to spend at least one hour a day on Project Blehm so I can finish it up! I know they are anxious to have some color on the wall during the dark danish december. I am making progress and adding more and more quilted detail, including some couched yarn (see the big red stripe).
Now I'm having fun! This is like icing and decorating the cake - the foundation is done and now it's all creativity and sweetness! Mmmmmm......

+copy.jpg)
+copy.jpg)
.jpg)
Now I'm having fun! This is like icing and decorating the cake - the foundation is done and now it's all creativity and sweetness! Mmmmmm......

+copy.jpg)
+copy.jpg)
.jpg)
Tuesday, September 30, 2008
Two more shots of Project Blehm
Two images - one quilted, one before quilting. Contrast and compare.


The Blehm Project Continues!


Monday, September 22, 2008
Vacation Inspiration
I love the the play of light, texture of rocks, the patina of old paint. All inspiration for the next project


I
Wednesday, September 10, 2008
3 week vacation

Wow. Three weeks of vacation. More than we've ever done before. France and Italy. Fantastic. More later. Here's just a few photos...


Wednesday, August 27, 2008


Sunday, August 24, 2008
Final Design
Well, here it is! The top is pretty much fused. I realized I needed larger elements in the center to balance it (the yellow and purple circles). The colors aren't totally accurate in the photo - at least not on my monitor. The background is really more turquoise than blue and the little row of squares in the center look white, but they are really yellow. But, you get the idea.


Tuesday, August 19, 2008
Have I gone too far?? Now What??

Is this too much?
I'm stuck. This is what we artist call being blocked. But you don't sit around saying "Oh dear. I'm a little blocked today. No worries! I'll just get on with life, pay the bills, clean up, buy groceries, trim the cat's claws, then I'm sure in a couple of hours I'll have a brilliant idea!!"

Crap - that's not right either!!
No your thought process is something along the lines of "Oh, god! Why did I agree to do this job? I'm a total hack! I'll never have a good/artistic/original/creative thought again! Can I back out? Can I pretend I forgot I agreed to do it? can I leave the country? Can I say the dog ate it?!"
It seems to be part of the process. I work with out a net, so to speak. I have and idea and just start. It builds and I get excited and I'm lovin' it! The piece practically designs itself..for a time. Then I manage to create myself into a corner and can't figure out how to get our of it. So I panic, I curse my empty mind, I curse the artwork, and why did I ever staqrt doing this 12 years ago anyway....
But then I breathe, let it sit for a few days and resume. Thing perculate, I stop obsessing, then it gets fun again. So now I am breathing and cleaning and otherwise distracting myself.
Friday, August 15, 2008


Wednesday, August 13, 2008


Tuesday, August 12, 2008
The Process Continues...
Indecision. It happens. What if both colors work - how do you choose? Better than nothing working, I suppose. I'm going to let it rest and make a decision after acupuncture and massage tomorrow.


Sunday, August 10, 2008
From Fabric to Work-in-progress
So this is how I work. Get the main colors and basic "bones" of the peice laid down, then audition lots of fabrics.

Once I have my stash of fabrics, I start adding the elements at random. When I add one element, my instinct is to balance it by placing a similar sized element or color else where in the piece.


Once I have my stash of fabrics, I start adding the elements at random. When I add one element, my instinct is to balance it by placing a similar sized element or color else where in the piece.

I don't want to have any large unbroken blocks of color, because a large unbroken block attracts too much attention and unbalances the piece, so I added some dark blue blocks to the big swatch of yellow. Compare this pic to the one above - it's getting much more interesting!
 This is probably the most time-consuming part. But once I have my main elements nailed down (or ironed, as it were...) then the rest of it usually falls into place easily.
This is probably the most time-consuming part. But once I have my main elements nailed down (or ironed, as it were...) then the rest of it usually falls into place easily.
Subscribe to:
Posts (Atom)
